I have a confession to make. For years, I was terrified of making a proper layered cake. All that leveling, splitting, and frosting felt like a high-wire act for a self-taught baker like me. Then, I found the answer in a recipe that felt like a hug: the Heaven on Earth Cake. It’s a fantastic no-bake option, but if you’re looking for a baked cake with a similar wow factor, you must try this stunning Blueberry Cheesecake Crumb Cake.
I published my version of this recipe a few years ago after a major kitchen win. It was for my best friend’s birthday, and I needed something stunning but secretly simple. This cake was my hero. It looks like you spent all day in the kitchen, but the magic is in how you put it together.
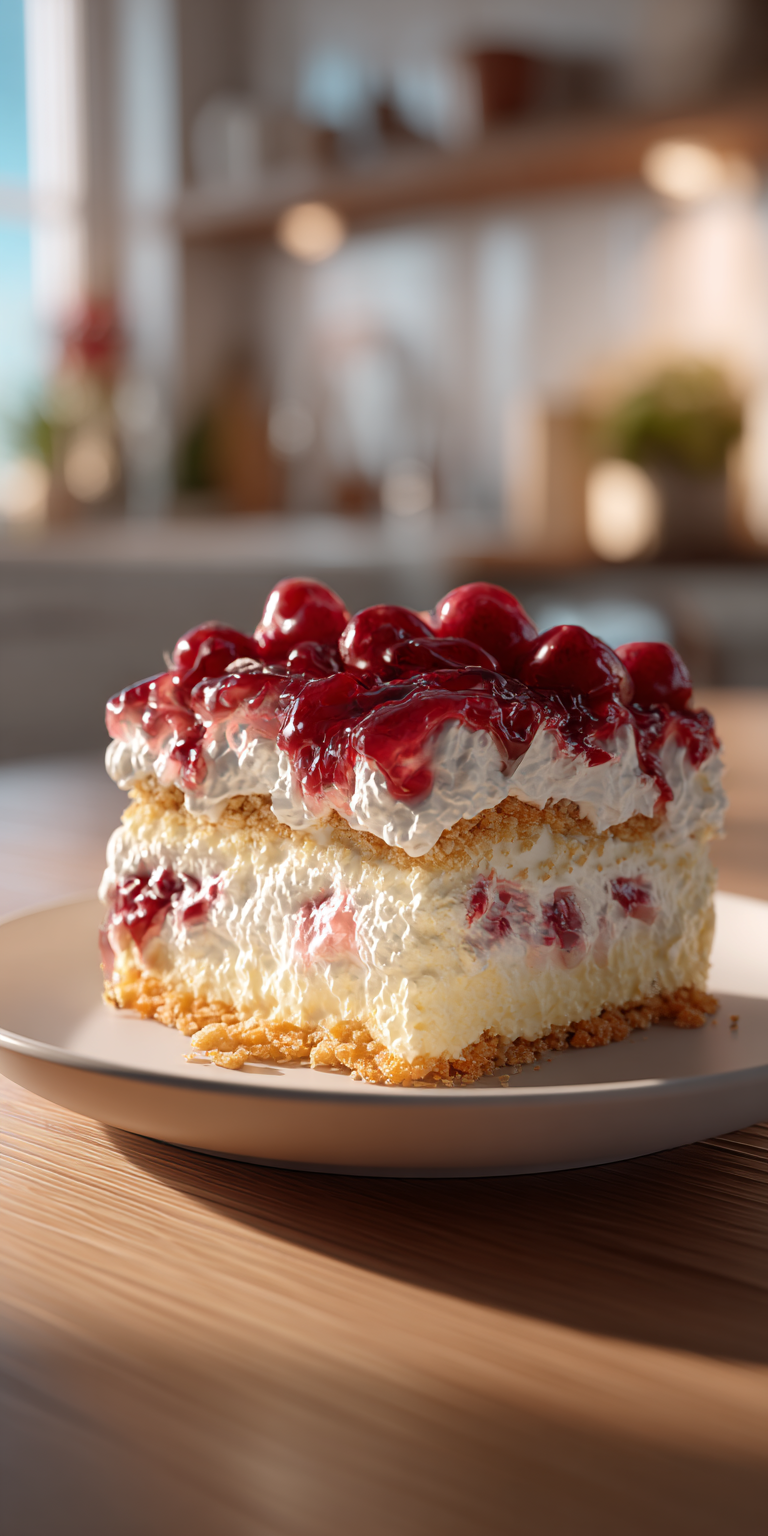
My secret? We don’t bake a single layer. Instead, we build this beauty right in the pan. It’s a no-bake wonder that comes together with simple ingredients. The layers sort of melt into each other, creating something truly magical. It’s the ultimate easy dessert for when you need a showstopper, fast.
Recipe Overview
- Cuisine: American
- Category: Dessert
- Prep Time: 25 minutes
- Cook Time: 0 minutes
- Total Time: 4 hours 25 minutes (includes chilling)
- Servings: 12
Why This Recipe is So Special
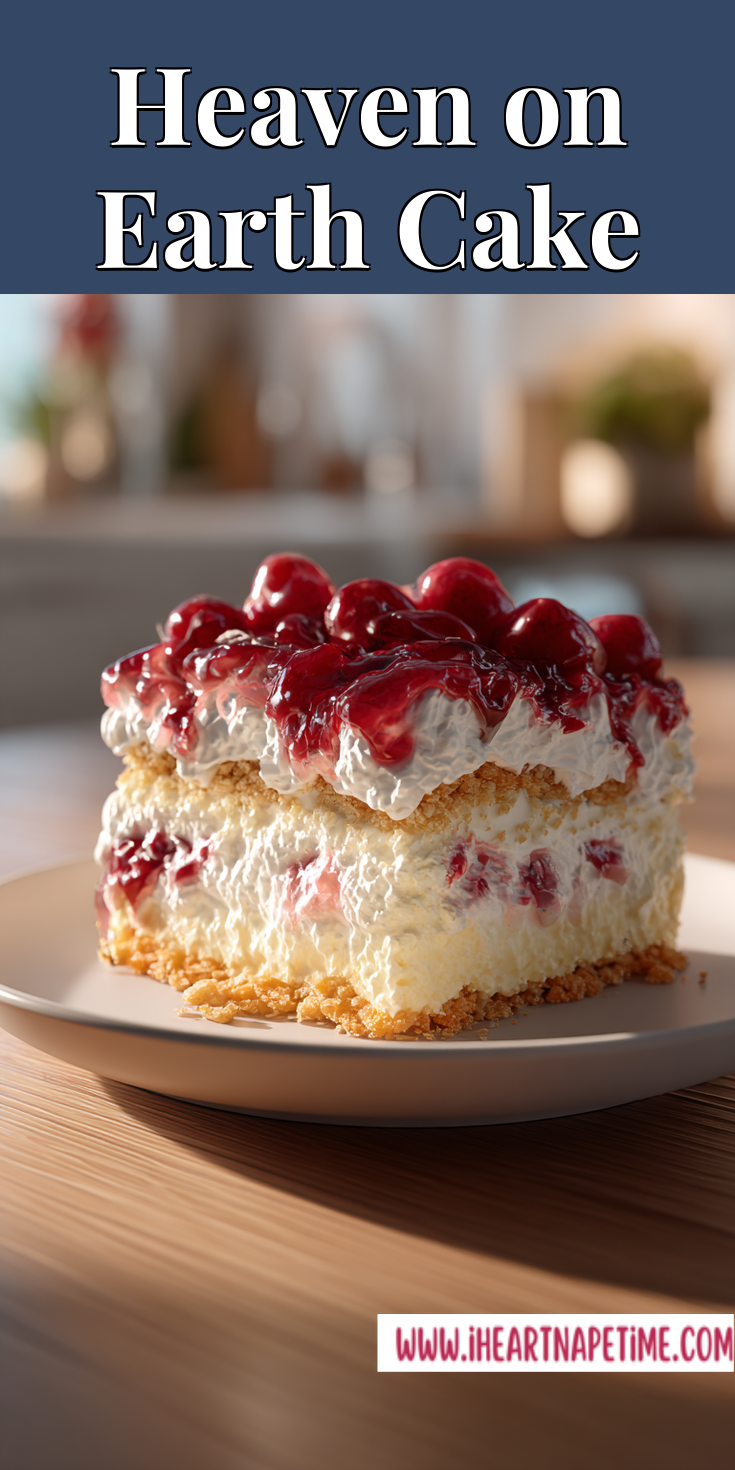
This cake is special because it breaks all the rules. There’s no oven, no fussy frosting, and no stress. The texture is what dreams are made of.
You get a creamy, cloud-like layer from the pudding and whipped topping. It sits on a tart cherry filling and a buttery crumb crust. Every bite is a perfect mix of sweet, tart, and crunchy. It’s a quick dessert that feels incredibly indulgent.
I love this technique because it’s forgiving. The layers settle as it chills, hiding any little imperfections. It always comes out looking perfect.
The Full Ingredient List
Here’s everything you’ll need. I promise, it’s all simple stuff you can find at any grocery store. Using full-fat ingredients here is key for the best texture.
- 1 (21 oz) can cherry pie filling
- 1 (15.25 oz) box yellow or butter cake mix (just the dry mix!)
- 1/2 cup (1 stick) unsalted butter, melted
- 1 cup chopped pecans or walnuts (optional, but great for crunch)
- 2 (3.4 oz) boxes instant vanilla pudding mix
- 3 cups cold whole milk
- 1 (8 oz) container frozen whipped topping (like Cool Whip), thawed
My Step-by-Step Method
Follow these steps in order. The sequence is what makes the magic happen. Just take your time and enjoy the process.
- Prep your pan. Grab a 9×13 inch baking dish. I don’t even grease mine. The first layer will keep everything from sticking.
- Create the first layer. Spread the entire can of cherry pie filling evenly across the bottom of the dish. Try to get it as level as you can.
- Make the crumb layer. In a medium bowl, mix the dry cake mix with the melted butter and chopped nuts. It will look like a thick, crumbly dough. Sprinkle this mixture evenly over the cherry layer. Don’t press it down!
- Build the creamy layer. In a large bowl, whisk the instant pudding mixes with the cold milk for 2 full minutes. It must thicken. Then, gently fold in the thawed whipped topping until no white streaks remain.
- Finish the assembly. Carefully spread the creamy pudding mixture over the crumb layer. Smooth the top with a spatula.
- The hardest part: wait. Cover the dish and refrigerate for at least 4 hours, but overnight is even better. This chill time is non-negotiable for the layers to set perfectly.
My Top Tips for Success
- Cold milk is a must. For the pudding to set right, your milk needs to be straight from the fridge. Room temperature milk will give you a soupy layer.
- Fold, don’t stir. When you add the whipped topping to the pudding, use a gentle folding motion. This keeps the mixture light and airy. Stirring too hard will deflate it.
- Let it chill fully. I know it’s tempting to cut in early. Please wait the full 4 hours. The cake needs that time for the crust to soften and the flavors to marry. It’s worth it.
- Switch up the fruit. Not a cherry fan? Blueberry or apple pie filling works beautifully here too. Make it your own! For another fantastic peach dessert, this simple Peach Cake is a reader favorite.
Common Mistakes to Avoid
I’ve made these so you don’t have to. Here’s how to steer clear of common pitfalls.
Heaven on Earth Cake Recipe
The Full Ingredient List
My Step-by-Step Method
Notes
Enjoy your homemade Heaven on Earth Cake Recipe!
Pressing the crumb layer. When you sprinkle the cake mix over the cherries, just let it be. If you press it down, it can become too dense and won’t absorb the moisture correctly as it chills.
Using the wrong pudding. You need “instant” pudding, not “cook-and-serve.” Instant pudding sets quickly with cold milk, which is perfect for our no-bake method.
Skipping the thaw. If your whipped topping is still frozen, you’ll have lumps in your creamy layer. Plan ahead and let it thaw in the fridge for a few hours.
NUTRITION INFORMATION
- Calories: 420kcal
- Carbohydrates: 62g
- Protein: 5g
- Fat: 18g
- Saturated Fat: 9g
- Cholesterol: 25mg
- Sodium: 480mg
- Sugar: 40g
*Nutrition is an estimate only and will vary with specific ingredients used.
FREQUENTLY ASKED QUESTIONS
Can I make this cake ahead of time?
Absolutely! In fact, I recommend it. Making it the day before you need it is ideal. The flavors get better, and the texture sets up perfectly overnight in the fridge.
Can I use homemade whipped cream instead?
You can, but the texture will be different. Stabilized whipped cream will work. The frozen topping holds its shape for days, which is why I use it here for a make-ahead dessert.
My crust seems dry. What happened?
This usually means it didn’t chill long enough. The moisture from the cherries and creamy layer needs time to soften the crust. Give it a full night in the fridge, and it should be perfect.
Leave a Reply! (I’d Love to Hear From You!)
Did you try this no-bake wonder? I’d love to know how it went in your kitchen! Did you stick with cherries or try a different fruit? Your tips and stories are my favorite part of baking. If you loved the fruity flavors here, you’ll adore the rich, comforting taste of this Peach Cobbler Pound Cake. Share your thoughts, questions, or a photo in the comments below. Happy baking!