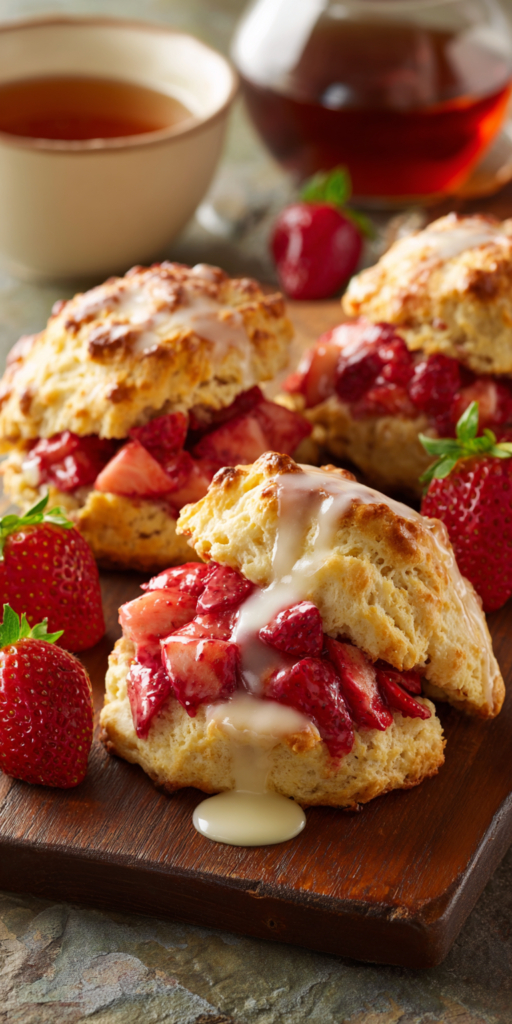
You’ve made scones before. You’ve probably even made strawberry scones. But you haven’t made Strawberry Shortcake Scones with Glaze like this.

There’s one secret ingredient that changes everything. It’s the difference between a good breakfast pastry and a spectacular one. Ready to find out what it is? If you love strawberry desserts, you should also try this Fluffy Strawberry Shortcake Puppy Chow for a fun, no-bake treat.
This recipe isn’t just about mixing fruit into dough. It’s about capturing the true, juicy essence of shortcake in a glazed pastry. I’m going to show you how.
Recipe Overview
Here’s the quick look at what we’re making today. This is your roadmap to the perfect tea time treat.
- Cuisine: American/British Fusion
- Category: Breakfast Pastry / Fruit Scones
- Prep Time: 20 minutes
- Cook Time: 18-22 minutes
- Total Time: 45 minutes (plus cooling)
- Servings: 8 large scones
The Secret Ingredient That Makes All the Difference
I’ve tested countless versions of this scone recipe. The game-changer wasn’t a fancy flour or exotic sugar.
It’s freeze-dried strawberry powder. You blend whole freeze-dried strawberries into a fine dust. This powder gets mixed right into the dry ingredients.
Why does it work? Fresh berries add moisture, which can make scones soggy. The powder gives an intense, pure strawberry flavor to every single bite. It also gives the scones a beautiful pink hue. It’s the soul of the shortcake, without the sogginess.
Why This Method is Better (My Pro-Tips)
My method focuses on two things: cold and confidence. Heat is the enemy of a flaky scone.
First, I grate frozen butter. This gives you perfect, pea-sized bits of fat with zero warm hands. Second, I use a folding technique. You’ll gently fold the dough to create flaky layers, like a rough puff pastry. This gives you a tall, shattering texture.
Strawberry Shortcake Scones with Glaze Recipe
The “Upgraded” Ingredient List
The Pro-Method (Step-by-Step)
Notes
Enjoy your homemade Strawberry Shortcake Scones with Glaze Recipe!
Nutrition Information
Finally, I chill the shaped scones before baking. This gives the gluten time to relax and the butter time to firm up again. It’s the pro move for the ultimate rise.
The “Upgraded” Ingredient List
Every ingredient here has a job. Using the best you can find will boost your results. Here’s what you need:
- 2 cups (250g) all-purpose flour
- 1/3 cup (65g) granulated sugar
- 1 tbsp baking powder
- 1/2 tsp fine sea salt
- 1/2 cup (about 10g) freeze-dried strawberries, blended to a powder
- 1/2 cup (1 stick / 113g) unsalted butter, FROZEN
- 1/2 cup (120ml) heavy cream, plus extra for brushing
- 1 large egg, cold
- 1 tsp pure vanilla extract
- 3/4 cup fresh strawberries, diced small
- For the Glaze: 1 cup powdered sugar, 2-3 tbsp heavy cream, 1 tbsp reserved strawberry powder, pinch of salt.
The Pro-Method (Step-by-Step)
Follow these steps in order. I promise, the process is as satisfying as the result.
- Prep: Preheat your oven to 400°F (200°C). Line a baking sheet with parchment paper. Blend your freeze-dried strawberries into a fine powder. Set aside 1 tablespoon for the glaze.
- Mix Dry: In a large bowl, whisk the flour, sugar, baking powder, salt, and strawberry powder.
- Butter: Using the large holes of a box grater, grate the frozen butter directly into the flour mixture. Toss gently with a fork to coat all the butter shreds.
- Mix Wet: In a separate jug, whisk the 1/2 cup heavy cream, the egg, and vanilla until smooth.
- Combine: Pour the wet mix over the dry. With a fork, mix until just shaggy and moistened. It will look dry in spots.
- Add Fruit: Gently fold in the diced fresh strawberries. They will bleed a little—that’s fine!
- Fold: Turn the crumbly dough out onto a lightly floured surface. Pat it into a rough rectangle. Fold it in half, then pat out again. Repeat this fold 2 more times. This builds layers.
- Shape & Chill: Pat the dough into a 7-inch circle, about 1-inch thick. Cut into 8 wedges. Place wedges on the baking sheet, 2 inches apart. Brush tops with heavy cream. Chill for 15 minutes.
- Bake: Bake for 18-22 minutes, until the tops are golden and a toothpick comes out clean. Cool completely on a wire rack.
- Glaze: Whisk the glaze ingredients until smooth. Drizzle generously over cooled scones. Let set for 10 minutes.
Common Mistakes & How to Fix Them
Even pros run into issues. Here’s how to fix the big ones before they happen.
Problem: Scones spread flat and don’t rise. Fix: Your butter was too warm. Make sure everything is cold, and don’t skip the pre-bake chill. Check your baking powder’s freshness.
Problem: Dough is too wet and sticky from the fresh berries. Fix: You diced the berries too big. Keep them small (pea-sized). If the dough feels too wet, use a light hand when folding and add a tiny bit of flour to your surface.
Problem: Scones are tough. Fix: You over-mixed. Stop when the dough just comes together. Those visible butter streaks and dry patches are what you want before the folding stage.
Variations for the Adventurous Cook
Once you master the base, play with it. That’s where the real fun begins.
Swap the freeze-dried strawberry powder for raspberry or peach. Add 1/2 teaspoon of almond extract to the wet ingredients for a marzipan note. For a citrus twist, add the zest of one lemon to the dry ingredients. For another fantastic baked good that uses fruit in a unique way, try these Pumpkin Banana Muffins with Strawberry & Lemon Glaze.
You can also make a cream cheese glaze. Just mix 2 oz softened cream cheese into the powdered sugar before adding the cream. It adds a lovely tang that cuts the sweetness.
Nutrition Notes
Let’s be real—this is a treat. But here’s a basic breakdown per scone (with glaze).
- Calories: ~380
- Fat: 18g
- Carbohydrates: 52g
- Protein: 5g
- Sugar: 28g
Your Pro-Level Questions Answered
You asked, I’m answering. These are the questions I get from my most dedicated home bakers.
Can I make the dough ahead of time?
Absolutely. Shape the scones, place them on the sheet, and freeze solid. Once frozen, bag them. Bake straight from frozen, adding 3-5 minutes to the bake time. This is my favorite weekend hack.
My glaze is too thin/thick. Help!
Glaze consistency is key. Too thin? Add more powdered sugar, a tablespoon at a time. Too thick? Add more cream, a teaspoon at a time. You want it to drizzle slowly off the whisk.
What’s the best way to store these?
Store in an airtight container at room temperature for 1 day. After that, the fresh berries make them best stored in the fridge for up to 3 days. The glaze will soften. I like to warm them for 10 seconds in the microwave.
A Few Final Secrets
You now have the blueprint. But the magic is in the details. Use a sharp knife or bench scraper to cut your wedges—a dull tool will seal the edges and hinder the rise.
For the most beautiful finish, drizzle the glaze back and forth in a zig-zag pattern. Let some of the pink scone peek through. It’s all about that homemade, artful look.
Finally, serve them the day they’re made. The contrast between the crisp exterior, tender interior, and sweet glaze is at its peak within hours. That’s the true tea time experience. I hope you enjoy these scones as much as I do. If you’re looking for more inspiration, these Pumpkin Banana Muffins with Strawberry Lemon Glaze are another reader favorite for a delicious twist on classic flavors.
Now that you have the secret, go try it! I want to hear all about it. Did the strawberry powder change the game for you? What variations did you try? Let me know in the comments below and give this recipe a rating if you loved it!