I love a party that feels special. But I don’t love being stuck in the kitchen while my guests are having fun. That’s why I’m a huge fan of easy one-pan meals like this One-Pan Honey BBQ Chicken & Rice for regular dinners, so I can save my energy for fun party recipes.
That’s why this Halloween Rice Krispies Brains recipe is my secret weapon. It looks like a stunning, spooky centerpiece straight from a mad scientist’s lab.
I promise you, it’s incredibly easy. We’re talking about a no-bake treat that comes together in minutes and brings pure, playful joy to any gathering.
Recipe Overview
Here’s everything you need to know at a glance. This is one of those fun easy recipes you’ll come back to every year.
- Cuisine: American
- Category: Dessert, Sweet Snack
- Prep Time: 20 minutes
- Cook Time: 5 minutes
- Total Time: 25 minutes (plus setting time)
- Servings: 8-10 brains
Why This is My Go-To for Guests
As a host, my goal is to be with my friends, not just cooking for them. This dish lets me do exactly that.
It has that instant “wow” factor that gets everyone talking and laughing. The best party snacks are conversation starters, and this one always is.
It’s also wonderfully forgiving. No baking means no worry about oven temperatures or things not rising. It’s a stress-free path to a fantastic sweet treat.
Make-Ahead Magic: My Hosting Secret
This is the part that truly makes entertaining feel effortless. You can do almost everything in advance.
Halloween Rice Krispies Brains Recipe

The “Wow Factor” Ingredients
How to Prepare Your Dish (Step-by-Step)
Notes
Enjoy your homemade Halloween Rice Krispies Brains Recipe!
Nutrition Information
The brains can be fully shaped and set a full two days before your party. Just store them in a single layer in an airtight container at room temperature.
On the day of, all you do is add the final drizzle of “blood.” This means you can greet your guests looking calm and collected, with an impressive dish already waiting.
The “Wow Factor” Ingredients
You only need a handful of simple things. The magic is in how you put them together. This is the beauty of homemade snacks.
- 1 (10 oz) bag of regular marshmallows
- 6 cups Rice Krispies cereal
- 3 tablespoons unsalted butter
- 1 teaspoon vanilla extract (for a lovely aroma)
- Pinch of salt
- Red gel food coloring
- 1/2 cup white chocolate chips or candy melts
- 1 teaspoon coconut oil or shortening
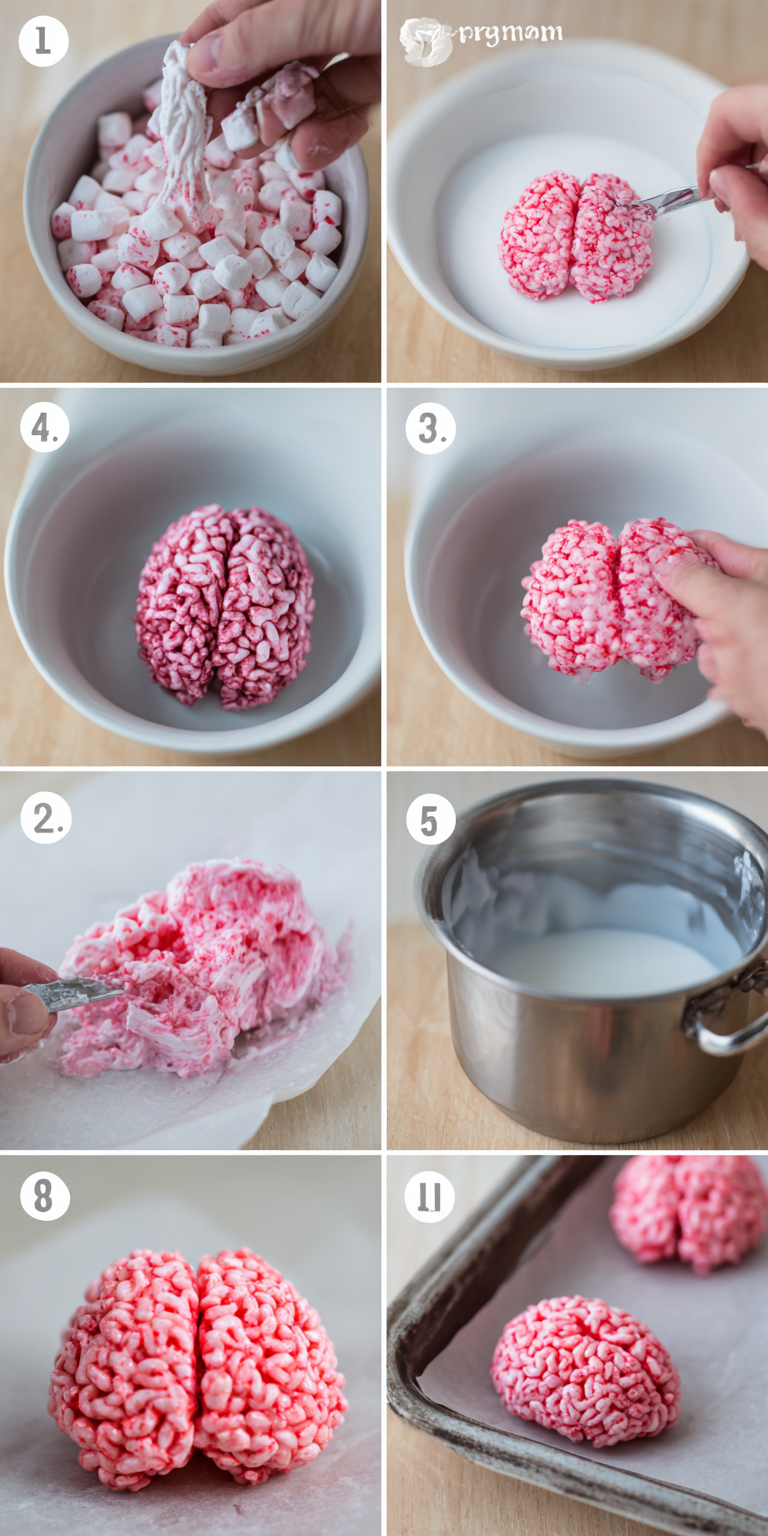
How to Prepare Your Dish (Step-by-Step)
Follow these simple steps for perfect brains every single time. Let’s make some sweet snacks easy.
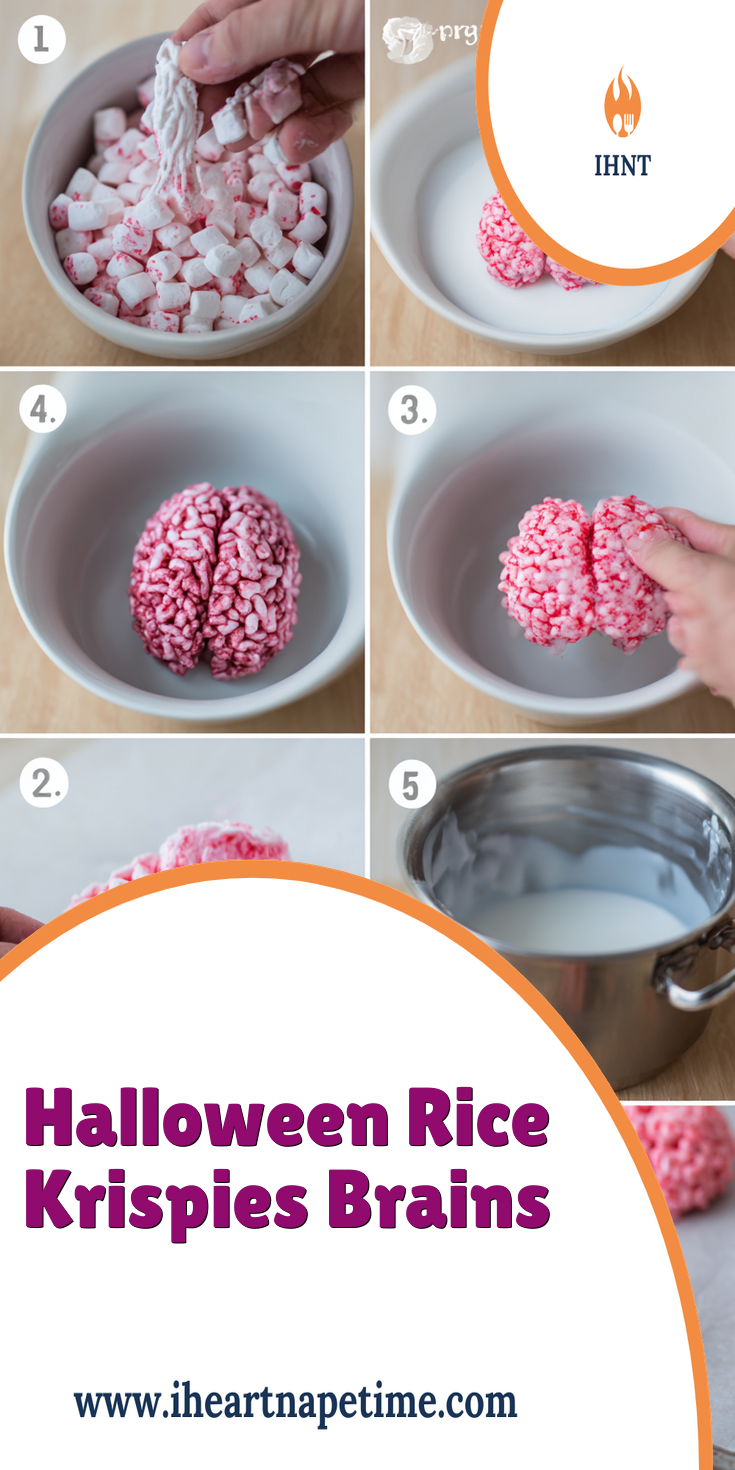
- Prepare your pan. Lightly grease a large baking sheet or line it with parchment paper. This is where your brains will set.
- Melt the base. In a large pot, melt the butter over low heat. Add the entire bag of marshmallows and stir until they are completely smooth and melted. Take the pot off the heat.
- Mix in color and flavor. Stir in the vanilla and a big pinch of salt. Now, add the red gel food coloring. Start with a few drops and stir until you get a deep, pinkish-gray “brain matter” color.
- Combine with cereal. Immediately pour in the 6 cups of Rice Krispies. Gently but quickly fold them into the marshmallow mixture until every piece is coated.
- Shape the brains. Let the mixture cool just until you can handle it. Scoop out large, uneven mounds. With buttered or greased hands, shape each mound into a rough oval, then use the back of a butter knife to create a winding “sulcus and gyrus” brain pattern down the center.
- Let them set. Place each brain on the prepared sheet and let them cool and firm up completely, about 30 minutes.
- Create the “blood” drizzle. Melt the white chocolate with the coconut oil in a microwave-safe bowl in 20-second bursts, stirring until smooth. Stir in more red gel food coloring until it’s a vibrant, bloody red. Drizzle and splatter this dramatically over each cooled brain.
- Let the drizzle set. Allow the chocolate to harden completely before serving. This final touch is what makes them pop.
How to Serve This Like a Pro
Presentation is everything with a dish like this. A little staging goes a very long way.
I love to serve them on a large, dark slate platter or a sheet of parchment paper. Scatter a few plastic spiders or skeleton bones around for extra effect.
You can even label it with a small chalkboard sign that says “Cranial Confections” or “Mad Scientist Snacks.” It’s these small touches that turn sweets desserts into an experience.
Perfect Pairings (What to Drink & Serve With It)
This is a rich, sweet treat, so I like to balance it with simpler, savory party snacks.
For a full spread, pair it with salty pretzel rods, a sharp cheddar cheese board, or a bowl of classic popcorn. For a fun, savory bite that’s also great for parties, try these Veggie Rice Balls. For drinks, a dry sparkling cider or a rich chocolate stout for the adults is wonderful.
For a kids’ party, it pairs perfectly with “witches’ brew” punch (green lemon-lime soda) and savory finger foods like mini hot dogs or veggie sticks with dip.
Nutrition Notes
This is a festive treat, meant for celebration! Here’s a general idea of what’s in each serving.
- This is a dessert-focused recipe.
- It contains sugars and carbohydrates for energy.
- You can use a reduced-fat butter if you prefer.
- For a different twist, try using a brown rice crisped rice cereal.
Your Entertaining FAQs
Here are answers to the questions I get asked most often when I serve this at my own parties.
Can I make these with kids?
Absolutely. This is one of the most fun baking recipes for little helpers. They love adding the color and shaping the warm mixture. Just be careful with the initial melting steps, which are best for adults.
How far in advance can I make them?
You can shape the brains up to two days ahead. I wait to add the red chocolate drizzle until the day of the party, so it looks its freshest and brightest. This keeps it as one of the best quick recipes snacks for busy hosts.
My mixture is too sticky to shape. What do I do?
This just means it’s a bit too warm. Let it sit in the pot for another 5-10 minutes, stirring occasionally. Always grease your hands well with butter or cooking spray—this is the key to easy shaping.
I hope this recipe becomes a joyful, stress-free tradition in your home. It has saved my hosting sanity more times than I can count.
It proves that the most impressive food dishes are often the simplest to make. You get all the credit, with only a fraction of the work.
I’d love to hear how your party went! Did your guests gasp? Did the kids go wild? Leave a comment and a rating below!