Some recipes just feel like a warm hug. For me, this classic Strawberry Pretzel Salad Dessert is one of them. It’s not a salad in the leafy green sense, and that’s part of its quirky, wonderful charm. If you love strawberry desserts, you might also enjoy this dreamy Fluffy Strawberry Shortcake Puppy Chow.
It’s a layered masterpiece of salty, sweet, creamy, and fruity. Every bite takes me right back to my grandma’s kitchen and sunny afternoons at family reunions.
If you’ve never tried it, you’re in for a treat. If you grew up with it, welcome back to a sweet slice of nostalgia. Let’s make it together.
Recipe Overview
- Cuisine: American
- Category: Dessert / Side Dish
- Prep Time: 30 minutes
- Cook Time: 10 minutes
- Total Time: 4 hours 40 minutes (includes chilling)
- Servings: 12
The Story Behind This Classic Recipe
This dish has been a staple at church potlucks and family picnics for decades. I can still see the sun-dappled checkered tablecloth and hear the buzz of conversation.
My grandma always had one waiting in her fridge. She’d bring it out with a proud smile, knowing it was the first dish to disappear.
Its origins are a bit of a happy mystery, likely born in mid-20th century American kitchens. It was a time when gelatin salads and creative use of pantry staples ruled the day.
That mix of crunchy pretzels, rich cream cheese, and bright strawberry jello just clicked. It became an instant classic, passed down through generations on stained recipe cards.
What Makes This the *Traditional* Way
You might see modern twists with different fruits or nuts. But the true, beloved version sticks to a simple formula.
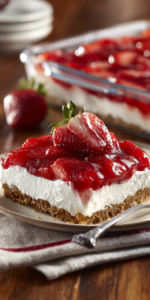
The crust must be made with salted pretzels for that perfect salty kick. The middle layer is always sweetened cream cheese and whipped topping, never just plain whipped cream.
Strawberry Pretzel Salad Dessert Recipe
The Classic Ingredients (No Fancy Stuff!)
How to Make It Just Like Grandma Did
Notes
Enjoy your homemade Strawberry Pretzel Salad Dessert Recipe!
Nutrition Information
The top is pure, vibrant strawberry gelatin, loaded with real frozen berries. It’s this specific trio of textures and flavors that creates the magic. We’re not changing a thing.
The Classic Ingredients (No Fancy Stuff!)
Here’s your simple grocery list. Each part plays a key role in the final, comforting bite. For another fun way to use frozen strawberries, try these easy strawberry yogurt bites.
- For the Pretzel Crust:
- 2 cups crushed salted pretzels (about 6 oz)
- 3/4 cup (1.5 sticks) unsalted butter, melted
- 3 tablespoons granulated sugar
- For the Creamy Middle Layer:
- 8 oz cream cheese, softened to room temperature
- 1 cup granulated sugar
- 8 oz frozen whipped topping (like Cool Whip), thawed
- For the Strawberry Top Layer:
- 6 oz package strawberry gelatin (like Jell-O)
- 2 cups boiling water
- 20 oz package frozen sliced strawberries in sugar (do not thaw)
How to Make It Just Like Grandma Did
Follow these steps carefully. The secret is in letting each layer set properly before adding the next.
- Heat your oven to 350°F (175°C).
- Make the crust. Mix the crushed pretzels, melted butter, and 3 tablespoons sugar in a bowl. Press this mixture firmly and evenly into the bottom of a 9×13 inch baking dish.
- Bake the crust for 10 minutes. Take it out and let it cool completely on a wire rack. This is very important for a crisp base.
- Make the creamy layer. In a large bowl, beat the softened cream cheese and 1 cup sugar together until it’s completely smooth and creamy.
- Gently fold in the thawed whipped topping with a spatula until no white streaks remain.
- Spread this creamy mixture evenly over the completely cooled pretzel crust. Be gentle to keep the crust intact. Place the whole dish in the fridge.
- Make the strawberry layer. In a separate bowl, dissolve the strawberry gelatin in the 2 cups of boiling water, stirring for 2 full minutes.
- Stir in the entire package of frozen strawberries. The berries will chill the mixture quickly. Let it sit for about 10-15 minutes, until it’s slightly thickened but still pourable.
- Carefully pour the strawberry gelatin mixture over the chilled cream cheese layer.
- Return the dish to the refrigerator. Let it chill for at least 4 hours, or overnight is best. This allows every layer to set up perfectly.
My Tips for Perfecting This Classic
A few small tricks make a big difference. They’re the kind of tips you’d get whispered over a kitchen counter.
First, make sure your cream cheese is truly soft. This prevents lumps in your creamy layer and makes it easy to spread.
Second, let the strawberry gelatin cool and thicken slightly before pouring. If it’s too hot, it will melt the creamy layer below and make a mess.
Finally, for clean slices, dip your knife in hot water and wipe it dry between each cut. It glides right through the jello and cream.
How to Store and Enjoy Later
This dessert needs to stay chilled. Keep it covered in the refrigerator for up to 3 days.
The crust will soften a bit the longer it sits, but it’s still delicious. I do not recommend freezing it, as the texture of the creamy and jello layers will change.
Serve it cold, straight from the fridge. It’s the ultimate make-ahead dish for any gathering.
Nutrition Notes
This is a treat, through and through. Here’s a general idea of what’s in a serving.
- Calories: ~380
- Total Fat: 19g
- Saturated Fat: 13g
- Sugar: 38g
- Protein: 4g
Your Questions About This Classic Recipe
Here are answers to the questions I get asked the most about this picnic food favorite.
Can I use fresh strawberries instead of frozen?
I don’t recommend it for this traditional recipe. Frozen berries help the jello set properly and quickly. Fresh berries can float and might make the top layer too runny.
Can I make this with a different flavor of gelatin?
You can, but strawberry is the classic. Raspberry is a common and tasty variation. Just try to use a corresponding frozen fruit for the best texture and flavor.
Why is my creamy layer runny?
This usually happens if the cream cheese was too cold when mixed, or if the strawberry gelatin mixture was still warm when poured on top. Patience with cooling is key!
I hope this recipe brings a wave of warm memories and creates new ones around your table. It’s more than just a dessert; it’s a taste of shared history and simple joy. If you’re looking for another decadent strawberry dessert, you must try this rich Strawberry Chocolate Cake.
Gather your ingredients, put on some music, and enjoy the process. Making this dish is as comforting as eating it.
Did your family make this classic too? What’s your favorite memory tied to it? Please share your stories and photos in the comments below. I’d love to hear from you!