Does anyone else feel like a short-order cook by 5 PM? I know I do. One kid is suddenly “allergic” to green, another wants only crunchy food, and the toddler is using their plate as a modern art canvas. The struggle to find one snack or dessert that gets a unanimous “yes” is so, so real.
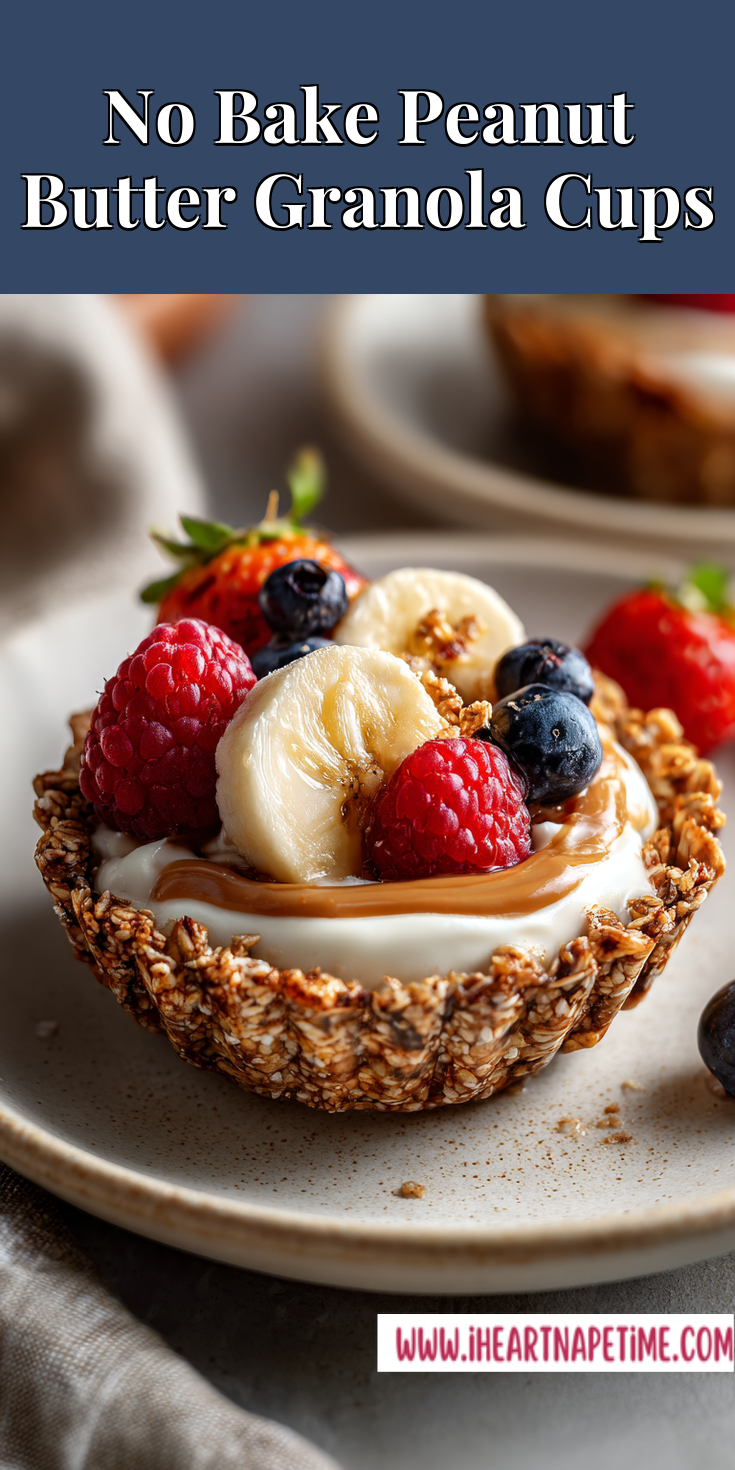
That’s why I’m practically doing a happy dance to share our new favorite fix: No Bake Peanut Butter Granola Cups. They are my secret weapon for happy bellies and a calm(er) kitchen. They’re the perfect quick dessert for when you need a win, fast. If you’re looking for another mess-free, fun toddler snack, you’re in the right place.
Think of them as a healthier, handheld treat that feels like a special indulgence. They come together in minutes, require zero oven time (hello, cool kitchen!), and are endlessly customizable. Even my most skeptical eater was won over by the first bite.
Recipe Overview
- Cuisine: American
- Category: Snack / No-Bake Dessert
- Prep Time: 15 minutes
- Cook Time: 0 minutes
- Total Time: 15 minutes (plus 30 min to chill)
- Servings: 12 cups
Why Even My Picky Eaters Love This!
I’ve learned that kid appeal comes down to a few key things. This recipe hits them all. First, texture is huge. The combo of crunchy granola and creamy filling is a total win. Second, they’re perfectly sized for little hands—no messy slices falling apart.
Best of all, they’re not overly sweet. The peanut butter and honey give a rich flavor that doesn’t rely on a sugar rush. It’s a treat you can feel good about serving. Plus, the “no-bake” part means they can help make them without any hot oven worries! For another fantastic no-bake treat that combines chocolate and peanut butter, you have to try these Chunky Monkey Banana Bites.
Our Family-Friendly Ingredient List
I keep it simple. You probably have most of this in your pantry right now. No fancy trips to the store needed!
- 2 cups old-fashioned rolled oats (not instant)
- 1 cup creamy peanut butter (see FAQ for subs!)
- 1/2 cup honey or pure maple syrup
- 1/4 cup melted coconut oil or unsalted butter
- 1 teaspoon pure vanilla extract
- A big pinch of salt
- 1/2 cup mini chocolate chips, plus more for topping
How to Get the Kids Involved in Cooking This
Getting kids in the kitchen is about simple, safe jobs that make them feel proud. This recipe is perfect for that.
My little ones love measuring and pouring the oats into the big bowl. It’s a great chance to talk about counting and sizes. Their absolute favorite job is pressing the granola mixture into the muffin tin cups. It’s like edible playdough! I give them a small spoon to help scoop the mixture, then let them use their fingers to press it down and shape the cups.
The Full Step-by-Step Instructions
Don’t let the steps fool you—this is incredibly easy. We’re basically mixing, shaping, and chilling. You’ve got this!
No Bake Peanut Butter Granola Cups Recipe
Our Family-Friendly Ingredient List
The Full Step-by-Step Instructions
Notes
Enjoy your homemade No Bake Peanut Butter Granola Cups Recipe!
- Grab a large mixing bowl. Add the rolled oats, peanut butter, honey, melted coconut oil, vanilla, and salt.
- Stir everything together until it’s fully combined and looks like a thick, sticky dough. A sturdy spoon or even clean hands works best here.
- Fold in the 1/2 cup of mini chocolate chips. Try to save a few for the tops later!
- Line a 12-cup muffin tin with paper or silicone liners. This makes removal super easy.
- Scoop the mixture evenly into the 12 liners. Press it firmly down and up the sides to form a cup shape. A small glass or measuring spoon can help smooth it out.
- If you saved chocolate chips, press a few into the top of each cup for a pretty finish.
- Place the whole tray in the refrigerator for at least 30 minutes to let them set and firm up perfectly.
- Once firm, they’re ready to eat! Store any leftovers in the fridge.
Fun Twists for Different Tastes
This is where you can let your family’s preferences shine. It’s an easy dessert base that loves to play dress-up!
For a fun swap, try using sunflower seed butter instead of peanut butter for a nut-free version. You can also stir in a handful of raisins or dried cranberries instead of chocolate chips. For a protein boost, mix in a scoop of vanilla protein powder with the oats.
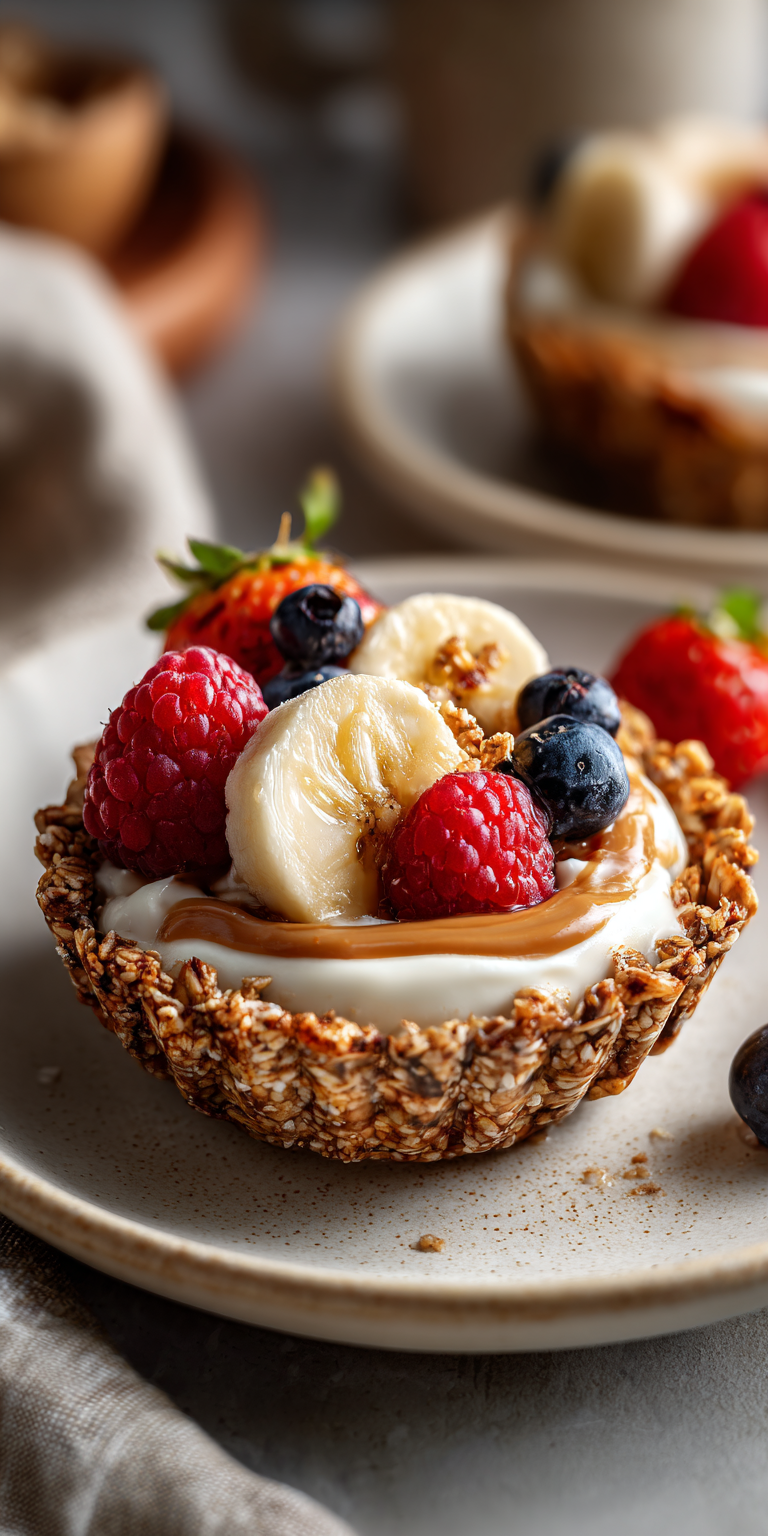
Want to make it feel extra special? After they’re set, fill the cups with a dollop of Greek yogurt and a drizzle of honey. Or, for a treat that reminds me of a moist homemade carrot cake, mix a little cinnamon into the base and fill the set cups with a simple cream cheese frosting swirl!
Storing & Reheating (Perfect for Busy Nights)
These are the ultimate make-ahead snack. I often whip up a double batch on Sunday.
Keep them stored in an airtight container in the refrigerator. They’ll stay perfect for up to a week. You can also freeze them for up to 2 months! Just layer them between parchment paper in a freezer-safe bag. Thaw in the fridge or at room temperature for a bit. No reheating needed—they’re meant to be enjoyed cool and firm.
Nutrition Notes
While it’s a treat, it’s made with simple ingredients that offer some good stuff too. Here’s a quick look at what’s inside each cup (approximate):
- A good source of fiber from the oats.
- Healthy fats and protein from the peanut butter.
- Natural sweetness from honey.
- Portion-controlled to help with mindful snacking.
FREQUENTLY ASKED QUESTIONS
Can I make these nut-free?
Absolutely! Just swap the peanut butter for a seed butter, like sunflower seed butter. It works just as well and tastes delicious.
My mixture seems too dry/crumbly. Help!
No problem! This can happen if your peanut butter is very thick. Simply add an extra tablespoon of honey or melted coconut oil and mix again. It should come together nicely.
Can I use quick oats instead of old-fashioned?
You can, but the texture will be less chewy and more soft. Old-fashioned oats give the best structure and bite, so I recommend sticking with them if you can.
I really hope this recipe brings a little peace and a lot of yummy bites to your table. It’s saved my sanity on more than one chaotic afternoon. If you love the idea of a cool, creamy, and crunchy snack, you’ll adore these easy Frozen Yogurt Granola Cups for a refreshing twist.
I’d love to know if this was a hit with your family! Did your kids pick a fun twist? Please leave a comment and rating below!